Flask is a very popular and powerful framework for building web applications. Over the last years, people used it to create REST APIs that work well with decoupled, modern front-end applications.
One challenge that backend development teams often face, is how to make it easy for front-end developers, whether internal or with a distant community, to create API-compliant clients (web app, mobile app or even CLI tools…)
In the wild, they are many good examples of well-documented APIs… Take the Twitter API : the docs are great, user-friendly and cover all the available endpoint with tips and examples. Any fresh CS student could write a small Python tool using it, just by following the documentation and its examples.
At @Ooreka, we decided to follow the OpenAPI (f.k.a. Swagger 2.0) specification to build a solid documentation for our Flask-powered micro-services APIs. Let’s dive in.
3…2…1… Doc!
The first step for generating your documentation is to obtain a standardized spec file describing your API.
Thanks to the apispec lib, you can automagically generate a specification file (commonly named swagger.json) from your Flask code. Some other libraries can do a lot of magic for you, but apispec is really simple to use and can sit next to your code without interfering with it. It supports Marshmallow and Flask, allowing you to re-use your code to generate a proper documentation !
Let’s write our generation script, e.g. app/scripts/openapi.py :
from apispec import APISpec

# Create spec
spec = APISpec(
    title='My Awesome API',
    version='1.0.42',
    info=dict(
        description='You know, for devs'
    ),
    plugins=[
        'apispec.ext.flask',
        'apispec.ext.marshmallow'
    ]
)

# Reference your schemas definitions
from app.schemas import FooSchema

spec.definition('Foo', schema=FooSchema)
# ...

# Now, reference your routes.
from app.views import my_route

# We need a working context for apispec introspection.
app = create_app()

with app.test_request_context():
    spec.add_path(view=my_route)
    # ...

# We're good to go! Save this to a file for now.
with open('swagger.json', 'w') as f:
    json.dump(spec.to_dict(), f)
Here, we first create a new APISpec instance with some details about our API. Then, we add our definitions (here, we are using Marshmallow to define how our API will serialize/deserialize data) with APISpec.definition(). Finally, we add our routes to our API specification using APISpec.add_path(). apispec will parse your route functions docstrings, so make sure you add some OpenAPI YaML stuff here, as in :
@app.route('/foo/<bar_id>')
def my_route(gist_id):
    """ Cool Foo-Bar route.
    ---
    get:
        summary: Foo-Bar endpoint.
        summary: Get a single foo with the bar ID.
        parameters:
            - name: bar_id
              in: path
              summary: Bar ID
              type: integer
              required: true
        responses:
            200:
                summary: Foo object to be returned.
                schema: FooSchema
            404:
                summary: Foo not found.
    """
    # (...)
    return jsonify(foo)
You will end up with a valid JSON API specification. Now, let’s see how to bootstrap an HTML version and show it to the world!
Browserify-ing all this
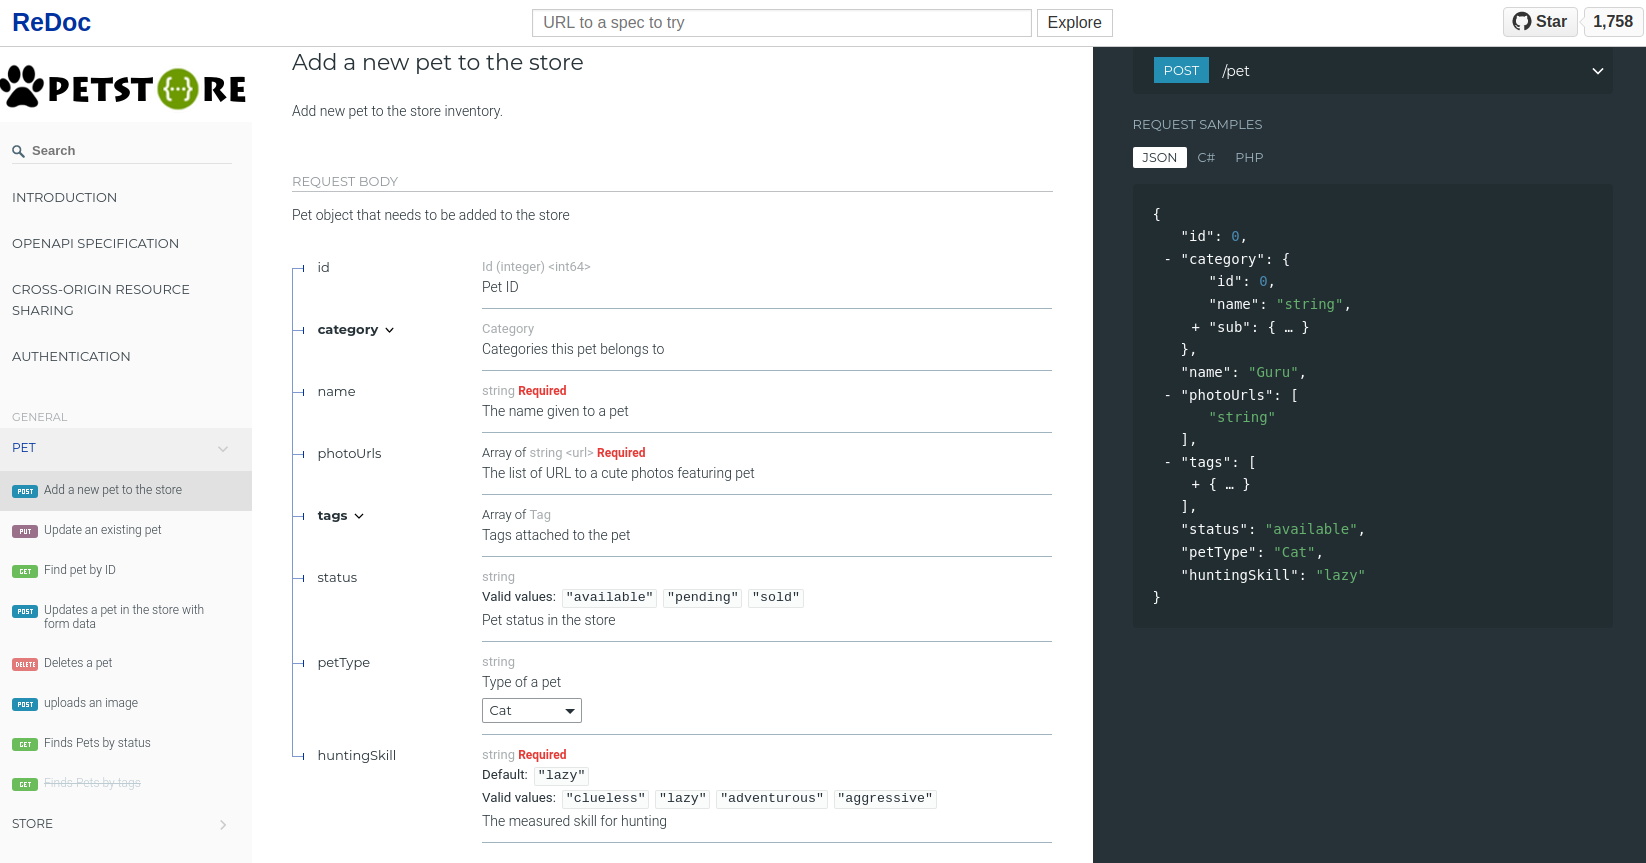
A really cool tool to do that is the ReDoc Javascript library from the guys at APIs.guru. We’ll use it to present the generated JSON specification in a convenient way.
 Example of a HTML documentation with ReDoc.
ReDoc is basically a single, minified JS file you can include in a bare index.html file and tell it where your swagger.json is located. It uses a really neat 3 columns design : a navigation sidebar, a wide center section with your API endpoints definitions and a third column dedicated to requests or responses samples and examples.
<!DOCTYPE html>
<html>
  <head>
    <title>Cool API Documentation</title>
    <meta charset="utf-8" />
    <meta name="viewport" content="width=device-width, initial-scal=1" />
    <style>
      body {
        margin: 0;
        padding: 0;
      }
    </style>
  </head>
  <body>
    <redoc spec-url="./swagger.json" hide-loading></redoc>
    <script src="https://rebilly.github.io/ReDoc/releases/latest/redoc.min.js"></script>
  </body>
</html>
Yep, that was quick. Start a HTTP server (e.g. with python3 -m http.server) and go have a look at your cool, new documentation. All you have to do now is to host your HTML and JSON file on a server and you’re good.
You can check out a more complete, real-world example here.
Wrapping it up
The OpenAPI offers many options I didn’t cover here for brevity and simplification. You can add your server’s real endpoints to the doc, add many details about the parameters and responses of your routes, provide examples in your routes functions doc-strings that will be parsed and added to your spec, etc…
As a final tip, head to the Flask CLI documentation to see how easily you can hook your generation script into the command line interface of Flask (this will give you some bad-ass command like FLASK_APP=main.py flask generate_doc). Oh, and make sure you put this into your Continuous Integration routine to keep your API documentation up-to-date with your API!
Cheers!